Back to basics
Back to basics
Hi, my name is Igor Vieira and today I will show you some possible ways to test your application, first I don’t want to create a big app for our example it’s a simple To Do List and second this is post for be able to have a simple app when we can find the basis for an test. For that I have created a repository on Github and I will just to show you a good way to test my To Do List application and feel free to suggest any other way to test this app and make this a better example for everyone.
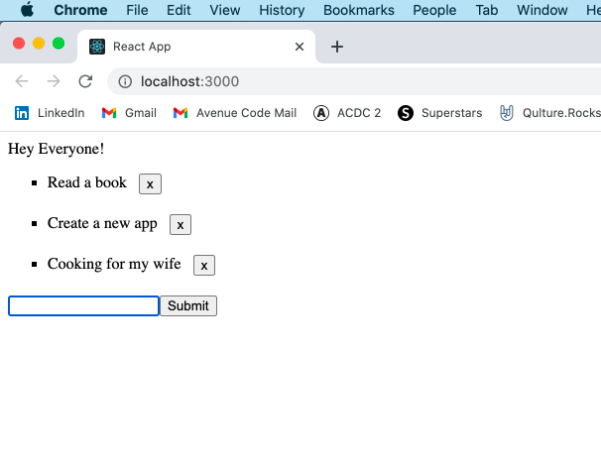
Ok, Now I will show you how this is app works and how we will create some tests for that
import React, { useState } from 'react';
import './App.css';

function App() {

  const [ listItem, setListItem ] = useState([]);
  const [ item, setItem ] = useState({ id: '', text: '' });

  const handleOnChange = (e) =>
    setItem({
      id: `${e.target.value}-${Math.random() * 100}`,
      text: e.target.value
    })

  const handleSubmit = (e) => {
    e.preventDefault()

    if (item?.text.length === 0) {
      return
    }

    setListItem([...listItem, item])
    setItem({ id: '', text: '' })

  }

  const handleDelete = (id) => {
    const newList = listItem?.filter(x => id !== x?.id)
    setListItem(newList)
  }

  return (
    <div className="App">
      <div>Hey Everyone!</div>
      <ul data-testid="todo-list">
        {
          listItem?.map((item, index) => (
            <li key={index}>
              <div style={{ display: "flex", marginBottom: 20 }}>
                <div>{item?.text}</div>
                <button
                  style={{ marginLeft: "12px", cursor: "pointer" }}
                  data-testid={`remove-button-${index}`}
                  onClick={() => handleDelete(item?.id)}
                >
                  x
                </button>
              </div>
            </li>
          ))
        }
      </ul>
      <form onSubmit={handleSubmit}>
        <input
          type="text"
          name="item"
          value={item?.text}
          data-testid="input-text"
          onChange={(e) => handleOnChange(e)}
        />
        <button data-testid="submit">Submit</button>
      </form>
    </div>
  );
}

export default App;
So if You are familiar with React You can see the two useState one for possible to add a item other one for a list of items
 const [ listItem, setListItem ] = useState([]);
 const [ item, setItem ] = useState({ id: '', text: '' });
We have here some functions for handle with changes in our input, other one for add a new item inside of that list and third one just for be able to delete some item by id.
const handleOnChange = (e) =>
    setItem({
      id: `${e.target.value}-${Math.random() * 100}`,
      text: e.target.value
    })

  const handleSubmit = (e) => {
    e.preventDefault()

    if (item?.text.length === 0) {
      return
    }

    setListItem([...listItem, item])
    setItem({ id: '', text: '' })

  }

  const handleDelete = (id) => {
    const newList = listItem?.filter(x => id !== x?.id)
    setListItem(newList)
  }
But if you look carefully you can see some data-testid I have add one for the list data-testid=“todo-list” another one for the delete button data-testid={remove-button-${index}}, one more for my input data-testid=“input-text” and the last one for the button to submit my new item data-testid=“submit.
return (
    <div className="App">
      <div>Hey Everyone!</div>
      <ul data-testid="todo-list">
        {
          listItem?.map((item, index) => (
            <li key={index}>
              <div style={{ display: "flex", marginBottom: 20 }}>
                <div>{item?.text}</div>


              </div>
            </li>
          ))
        }
      </ul>
      <form onSubmit={handleSubmit}>
        <input
          type="text"
          name="item"
          value={item?.text}
          data-testid="input-text"
          onChange={(e) => handleOnChange(e)}
        />
        <button data-testid="submit">Submit</button>
      </form>
    </div>
  );
And for any test I try to keep organized, and simple structure to be able see and understand what I need to test. I will start creating a new file called App.test.js and in the same file I will add the test-library and add our component App.js.
import { fireEvent, render, screen } from '@testing-library/react';
import userEvent from '@testing-library/user-event';
import App from './App';
So if you look for a moment you can see three functions here, the fireEvent the render and the screen it’s for now the only functions we need to render and checkpoints in our component but we will also use the userEvent to be able to click and get other actions in our component. The next step I want to create the base for our tests so here we have all the data-testid available and we have the structure of our component for be able to test the same component for each test also we have some expectedValues for some situations.
import { fireEvent, render, screen } from '@testing-library/react';
import userEvent from '@testing-library/user-event';
import App from './App';

const renderComponent = () => render(<App />);
const handleList = () => screen.getByTestId("todo-list");
const handleSubmit = () => screen.getByTestId('submit');
const handleType = () => screen.getByTestId('input-text');
const expectedValueOne = 'Drink a coffee'
const expectedValueTwo = 'Read an book'
const notExpectedValue = 'Lunch time'
Now I will create a new function and I will call that with the name addNewValues() and this is the exactly purpose of this function add new values in our list. If you look close in our App.js the data-testid it’s just the point for be able to click and do some action, so now we will do that. Look:
const addNewItems = (items = []) => {

	items.forEach(newItem => {

		userEvent.type(handleType(), newItem)

		fireEvent.click(handleSubmit());

	});

}
Here we have our addNewItems function and we receive a array in our parameter so the entire idea it’s pass on array with some value, an text and add in our list, look inside of our forEach we have the userEvent called the function type, the function type expected the data-testid in this case an input and a new item, so when we call this function we just fulfilled the input with some text. The second function called click this is from fireEvent we use that for simulate a click event, so here we just pass the function responsible for get the data-testid on our submit button. Okay! Next step it’s create our first test! But for reasons of we have a good structure for every file I try to keep a simple describe and add the tests inside of that.
import { fireEvent, render, screen } from '@testing-library/react';
import userEvent from '@testing-library/user-event';
import App from './App';

const renderComponent = () => render(<App />);
const handleList = () => screen.getByTestId("todo-list");
const handleSubmit = () => screen.getByTestId('submit');
const handleType = () => screen.getByTestId('input-text');
const expectedValueOne = 'Drink a coffee'
const expectedValueTwo = 'Read an book'
const notExpectedValue = 'Lunch time'

const addNewItems = (items = []) => {
  items.forEach(newItem => {
    userEvent.type(handleType(), newItem)
    fireEvent.click(handleSubmit());
  });
}

describe('ToDo App:', () => {


  	test('should to add an item on the list',  async () => {
  	...
});

	test('should to return two items in that list', async () => {
	...
})

  	test('should remove an item on the list',  () => {
  	...
});

})
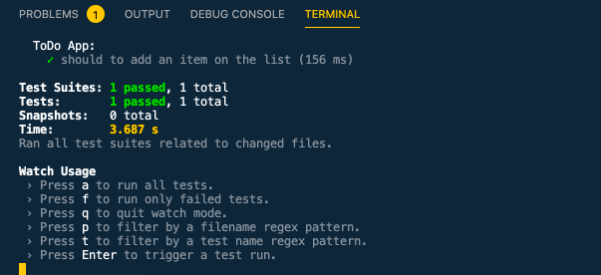
For our first test we just need to follow some steps, call our component, call our function for add new values and create some scenarios for test if we have our values or not:
test('should to add an item on the list',  async () => {
  renderComponent();

  await addNewItems([expectedValueOne, expectedValueTwo]);

  expect(screen.getByText(expectedValueOne)).toHaveTextContent(expectedValueOne);
  expect(screen.getByText(expectedValueTwo)).toHaveTextContent(expectedValueTwo);
  expect(screen.getByText(expectedValueOne)).not.toHaveTextContent(notExpectedValue);
});
Here we need to call our component and we have an function for that renderComponent() after that we just need to call our other function addNewItems and pass two of our expectedValue’s and in this case we have three expected scenarios, two for check if we have or not our expectedValues and the last for be able to say: “No, we don’t have the this one in our list” and that’s it. And for be able to see that we just need to run the command yarn test:
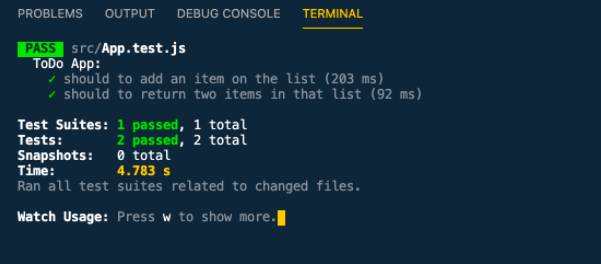
So in our second test we will verify if we have two items in our list and this is pretty simple:
test('should to return two items in that list', async () => {
  renderComponent();

  await addNewItems([expectedValueOne, expectedValueTwo]);

  expect(handleList().children.length).toBe(2);
})
Just like in the first one we need to call our component with renderComponent and call our function addNewItems after that we need to check if have or not the two values in our data-testid responsible for render the same expectedValues in our list, this one:
<ul data-testid="todo-list">
        {
          listItem?.map((item, index) => ( ...
And if you try to run that we can see our second test:
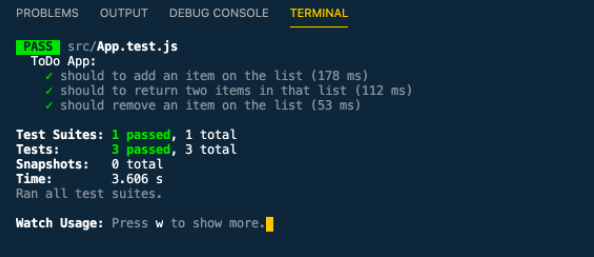
For our last one if you look carefully we have a button for remove some tasks in our list, in this case we just need to render our component, add a new item in our list…but in the end of that we just need to pass the correct position of this value and if you remember the first position in any array it’s zero so that it’s how our test looks like:
test('should remove an item on the list',  async () => {
    renderComponent();

    await addNewItems([expectedValueOne]);
    fireEvent.click(screen.getByTestId('remove-button-0'));

    expect(handleList()).not.toHaveTextContent(expectedValueOne);
  });
Looking in our component we can see a little detail for every item I pass an interpolate string for be able to get the position in our list and delete for the same position:
<button
    style={{ marginLeft: "12px", cursor: "pointer" }}
    data-testid={`remove-button-${index}`}
    onClick={() => handleDelete(item?.id)}
  >
    x
  </button>
And if you running your tests you can see all the tests passing:
So this is the basic with tests and test-library/react and I really like to do that because in our daily activities we will pass for some situations when the basic it’s the answer for some problems and all the time we forgot the power of have simple and good examples, thank you for your time.
Github Code: todo-test-library